By Charlotte Dakin-Norris
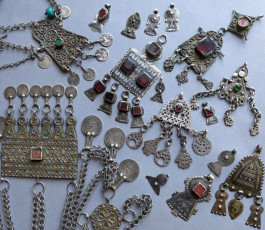
I was commissioned by Sarah Corbett to make a limited run of 30 Tanit pendants using scented paste.
Step 1 – The Design
The Punic Goddess Tanit has traditionally been symbolised as a disc resting on a triangle by the Amazigh peoples of North Africa.
There are many variants of this feminine and powerful motif.
Sarah already has a preferred design of a ring intersecting a triangle, inspired by a vintage Dinka ring.
There are limitations with working with scented paste. I wanted the bead to be strong, so the transition between the
disc and the triangle had to be adapted with steeper sides to the triangle, and to mitigate against the weakness of a
ring, I indented a circular area within the disk as a modification.
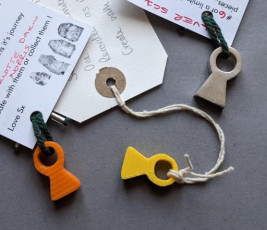
Step 2 – Making the Plaster Model
I made a sample using modelling clay to form a basic shape and then casting this in plaster of Paris. This could then be filed and sanded into the desired form.
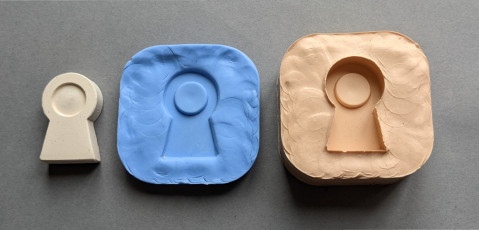
Step 3 – Making the Silicone Mould.
I then made a mould from the plaster model. The deeper bottom half was made using a softer two-part silicone
material which would aid removing the cast piece. The top section was made using a less pliable silicone which
would allow me to press down firmly onto the paste mixture and help prevent distortion.
Step 4 – Making the Scented Paste
For this paste I used one my favourite recipes but altered it slightly so that it would be unique for Sarah.
Here is a list of ingredients:
50g jatamansi (also known as spikenard or nard) powder
50g rose petal powder
50g agarwood powder
20g / 3 tablespoons mahlab powder
20g / 1 tablespoon ground cloves
10g amber perfume block
150g gum Arabic powder
250ml rosewater
5ml ambergris tincture
2ml geranium absolute
2ml rose essential oil
2ml neroli essential oil
Plus, a secret ingredient!
The method I used is to gradually heat and dissolve the gum Arabic in the rosewater until it reached a consistency
like golden syrup. I sieved all the dry ingredients into a large bowl, then grated the perfume block into the mixture.
Next, I stirred in enough gum Arabic so that the resulting paste could be formed into malleable balls. Finally, I added
the essential oils. The mix was then allowed to rest and amalgamate for two weeks.
Step 5 – Making the Beads
To make a bead I rolled up a ball of the paste to about the right size to fit into the bottom part of the mould and then
pressed it in to fill the shape. When the right amount was in there, the top part of the mould was pressed down onto
the bottom half. After a while I got quite adept at judging the right amount of mixture per bead!
I was surprised at how long the paste took to dry in the mould. For a simpler form I usually only wait an hour or so
until I can confidently remove it from the mould without it cracking or distorting. The Tanit form, however, needed six hours! Once the form had been demoulded, I turned it upside down on a piece of baking parchment to wait for
the other side to dry for another six hours. I then pieced it using a mandrel, which is like a long, thin metal skewer, and left it to air dry on the mandrel which was stood in a tumbler to keep the bead upright.
Step 6 – Finishing the Beads
I prefer to give my beads a worn appearance and I use simple tools to achieve this. This means no electrical devices!
I used various grades of sandpaper and sanding sticks; grades P120 to 320 to give a smooth surface to the sides,
added a bevelled edge and removed just a little of the surface texture from the faces of the bead. Using P800 to 1000 grades I achieved a slight polish on the top surface of each bead, leaving the details in the impressed surface
texture as a contrast. To finish I gave each bead a buff with a soft cloth.
I keep the leftover paste filings and sawdust
as it can be reused in the next batch of paste I make; nothing is wasted.
I used plenty of sanding sticks, sandpaper and cloth for this project!
Even though the same mould was used to make each bead, due to the pliability of the scented paste material, each
bead is unique. I love the texture – they look as though they are ancient artifacts!
Please note – the finished beads must be kept way from water as they are water-soluble
You can see Charlottes online tutorials here
If you would like to own one of the Tanit pendants please click here